Scribe
| Document | Care Scribe Feature Documentation (care_scribe) |
|---|---|
| Title | Care Scribe Feature Overview, Integration, and Operation |
| App Namespace | care_scribe |
| Last-Modified | 2024-08-19 |
| Github-Repo | https://github.com/ohcnetwork/care_scribe |
| Created | 2024-04-15 |
Introduction
The Care Scribe feature represents a substantial advancement in enhancing the accessibility and efficiency of form-filling applications. This introduction section will delve into the core functionalities of Care Scribe, highlighting the significant benefits it offers to users, particularly in terms of streamlining administrative processes and improving user experience. We will also explore the technology behind Care Scribe, how it integrates with existing systems, and its user interface features. Additionally, the scope of this documentation will be outlined, detailing what readers can expect to learn about the feature, including step-by-step guides, best use cases, and troubleshooting tips. This comprehensive overview aims to provide a thorough understanding of Care Scribe and its potential impact in various professional settings.
Overview of Care Scribe
Care Scribe is an innovative feature that integrates with the Care application to enable voice-assisted form filling. Utilizing advanced speech recognition technology, Care Scribe allows users to fill out forms using voice commands. This seamless interaction aims to enhance the user experience by making form-filling faster, more accurate, and accessible.
Table of Contents
- Introduction
- Getting Started
- Feature Flow
- Scribe Integration
- Frontend Integration
- Troubleshooting Guide
- Appendix
- Changelog
Purpose and Benefits
The primary purpose of Care Scribe is to streamline the data entry process within the Care application, mitigating the manual effort traditionally associated with this task. By leveraging the power of voice recognition, Care Scribe offers several benefits, including:
- Increased Accessibility: Makes the application more accessible to users with disabilities or those who may find typing difficult.
- Enhanced Efficiency: Speeds up the form-filling process, allowing users to complete forms faster than traditional methods.
- Reduced Errors: Improves data accuracy by reducing the likelihood of manual entry errors.
- User Experience: Offers a more engaging and user-friendly way to interact with the application.
Scope of Documentation
This technical documentation is designed to provide a comprehensive guide to the Care Scribe feature. It will cover the following aspects:
- A detailed explanation of the feature flow, including a breakdown of the flowchart provided.
- An in-depth look at the backend and frontend code, including how the various functions interact and contribute to the feature's operation.
- Guidance on setting up and integrating Care Scribe into existing Care application installations.
- An overview of testing procedures and deployment strategies.
- Troubleshooting tips and maintenance practices to ensure smooth operation.
It is intended for developers, system administrators, and technical staff involved in implementing and maintaining the Care Scribe feature within the Care application.
Getting Started
This section outlines the steps necessary to set up the Care Scribe feature within the Care application for both backend and frontend, as well as the integration of the Care Scribe plugin.
System Requirements
To run the Care Scribe feature, the following system requirements must be met:
- Docker and Docker Compose
- Python 3.7 or higher
- PostgreSQL 10.0 or higher
- Redis
- Node.js 12.x or higher
- npm (compatible with the version of Node.js)
Ensure that your development environment meets these prerequisites before proceeding with the installation and setup.
Installation Guide
Backend - Using Docker Compose
It is highly recommended to use Docker Compose for setting up the Care application, which will consist of several Docker containers: postgres, care, redis, celery, and localstack.
Steps to run the development server using Docker:
-
To start the development environment, execute:
$ make up -
To load dummy data for testing, run:
$ make load-dummy-data -
Access the application at http://localhost:9000 in your browser.
-
To stop the development environment, use:
$ make down -
To run tests:
$ make test
Backend - Manual Setup
For manual setup, configure PostgreSQL and then follow the steps provided in the backend repository's documentation. This includes setting up the database, installing pre-commit hooks, and creating a superuser for the application.
Setting up PostgreSQL:
-
Initialize the database and set up the
postgresuser password. -
Create a database named
care. -
Run the following commands:
export DATABASE_URL=postgres://postgres:<password>@127.0.0.1:5432/care
python manage.py migrate
python manage.py createsuperuser -
Use the command below to copy static files:
python manage.py collectstatic -
To load dummy data for testing:
python manage.py load_dummy_data
Frontend Setup
To set up the frontend of the Care application, ensure that you have Node.js and npm installed, and then follow these steps:
-
Install dependencies:
npm install --legacy-peer-deps -
Run the app in development mode:
npm run dev -
Access the frontend at localhost:4000 in your browser.
Add Care Scribe Plugin to Care Backend
-
Clone the
care_scriberepository into the same directory as the backend. -
Add it to the
INSTALLED_APPSin the backend settings by including it in thePLUGIN_APPS:PLUGIN_APPS = manager.get_apps()
INSTALLED_APPS = DJANGO_APPS + THIRD_PARTY_APPS + LOCAL_APPS + PLUGIN_APPS -
Run the plugin installation script:
python install_plugins.py
Initial Setup
Once the installation is complete, configure the environment variables, database connections, and other necessary settings as outlined in the repository's documentation for both the backend and frontend parts of the application. After configuration, ensure all services are running correctly and the application is ready for use and further development.
Feature Flow
This section details the operational flow of the Care Scribe feature, from the initiation of voice recording to the final form submission.
High-Level Feature Operation
Care Scribe enhances user interaction with form fields through voice commands. The feature operates by:
- Initiating voice recording when a user visits a form and activates the 'Voice Autofill' option.
- Stopping the recording on user command and processing the audio data.
- Transcribing the voice recording into text and mapping the transcription to the relevant form fields.
- Updating the form with the transcribed data and submitting it to the backend.
The process is designed to be intuitive and efficient, minimizing the need for manual text entry and reducing the potential for data entry errors.
Detailed Flowchart Explanation
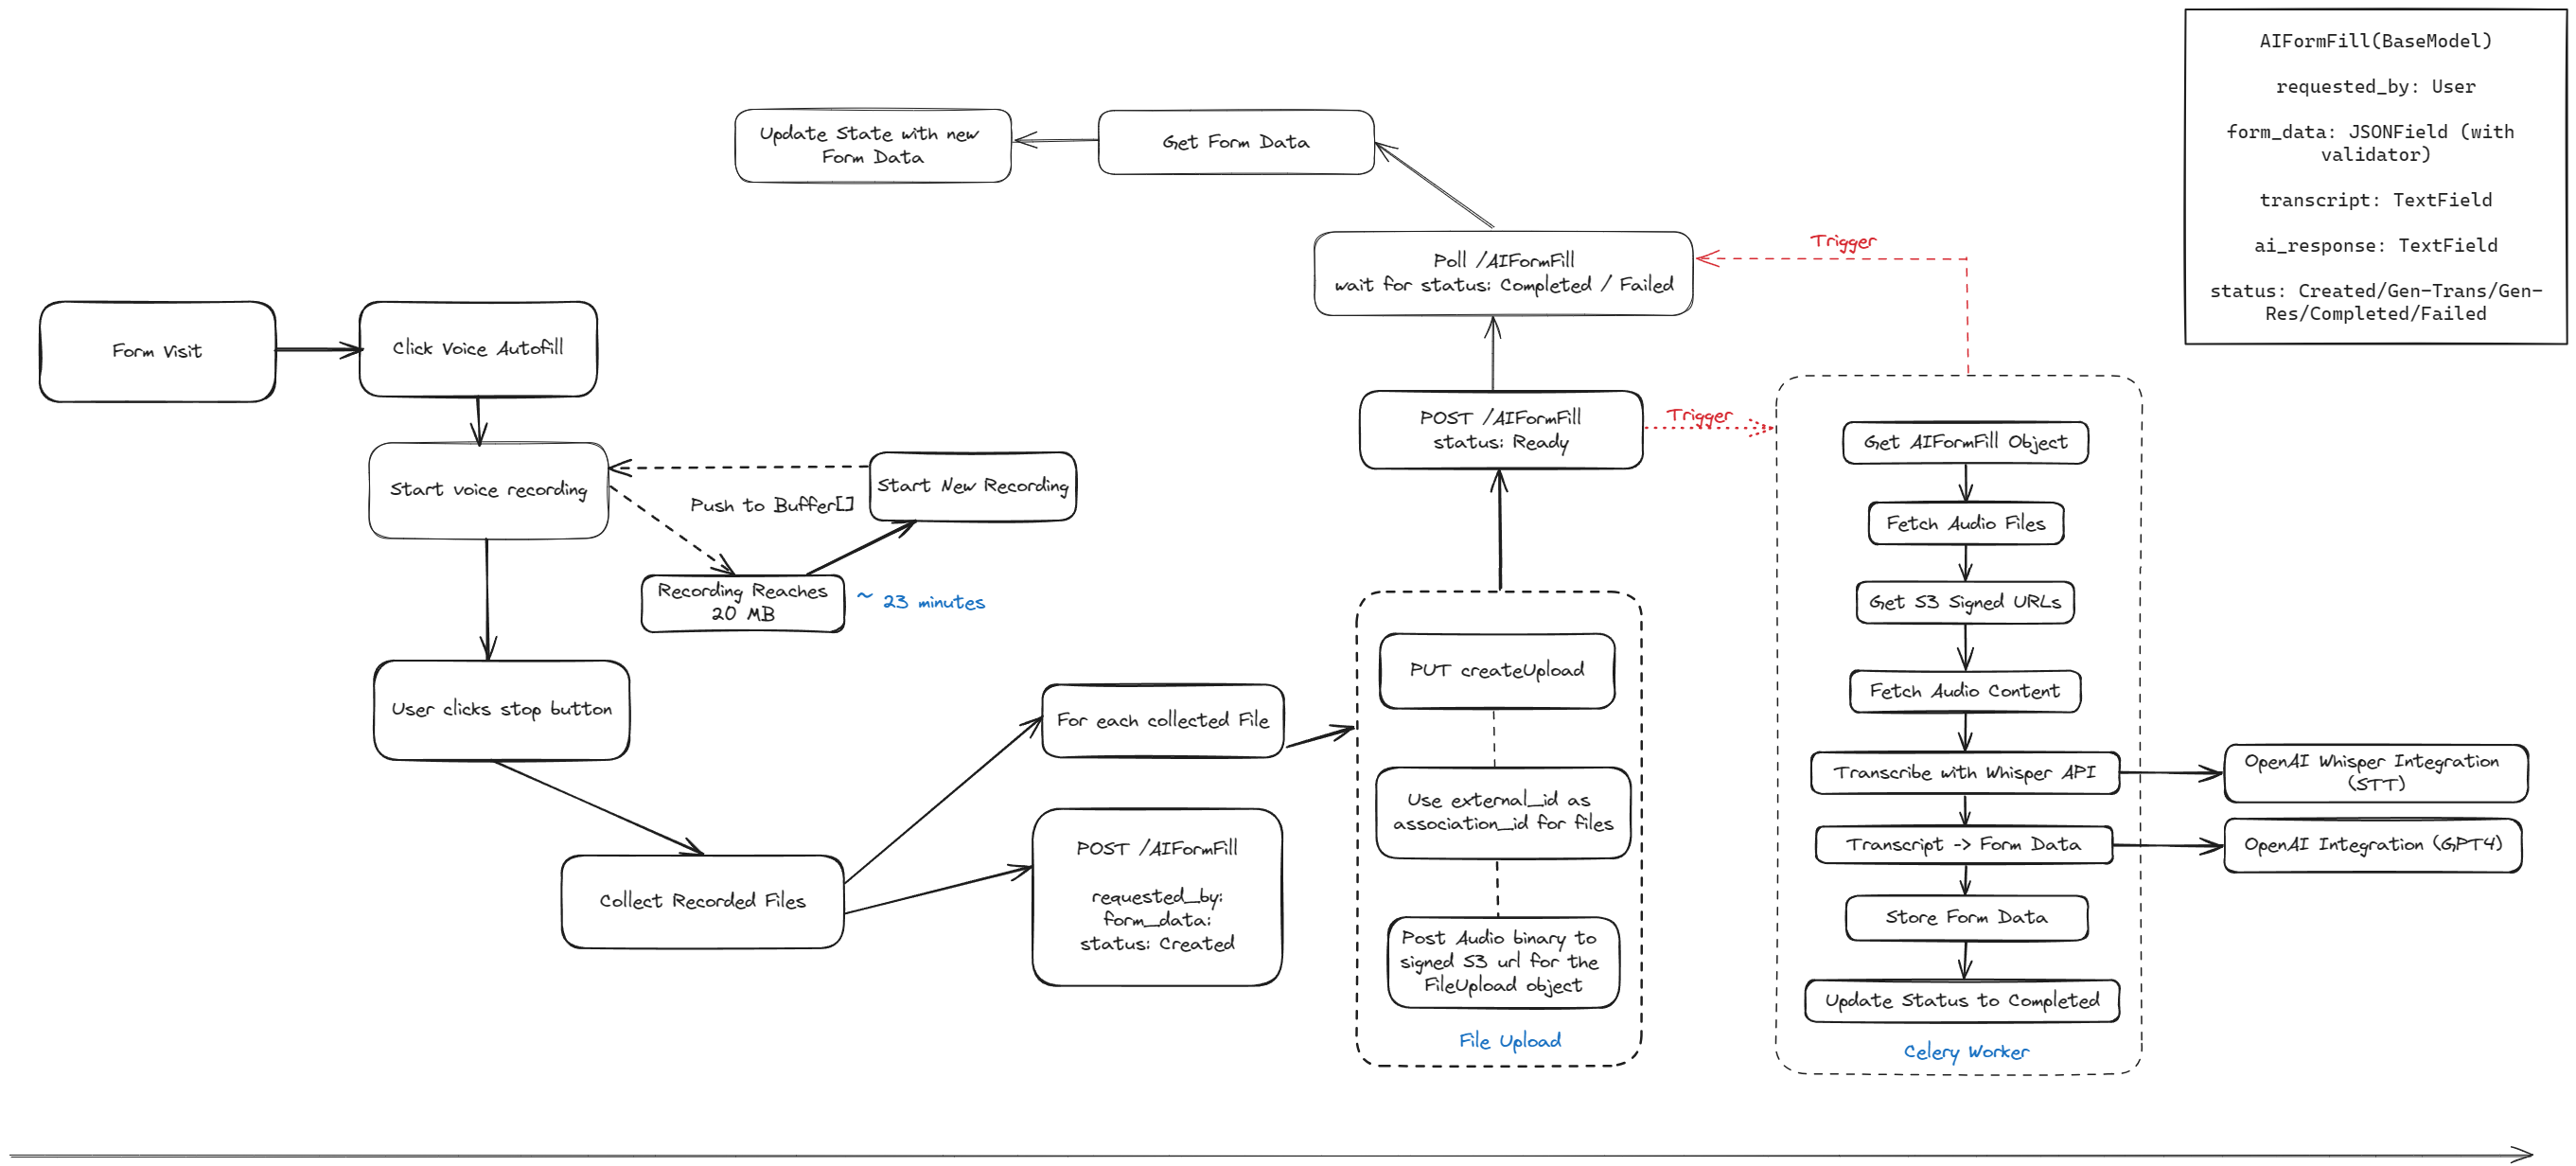
The flowchart outlines the step-by-step process of the Care Scribe feature. Below is an explanation of each step:
- Form Visit: The user navigates to a form within the application.
- Click Voice Autofill: The user initiates the voice autofill feature.
- Start Voice Recording: Care Scribe begins recording the user's voice inputs.
- User Clicks Stop Button: The user ends the voice recording session.
- Recording Reaches 20 MB or ~23 Minutes: The system automatically starts a new recording session to prevent data loss and ensure manageable file sizes.
- Start New Recording: If the initial recording session is stopped manually or reaches the file size/time limit, a new recording session begins.
- Push to Buffer[]: Audio data is temporarily stored in a buffer as it is being processed.
- Collect Recorded Files: The audio files are collected for transcription.
- POST /scribe: The system creates a new Scribe object with
requested_by,form_data, and sets the status to 'Created'. - PUT CreateUpload: Prepares the collected files for upload.
- For Each Collected File: Each audio file undergoes the following process:
- Use external_id as association_id for Files: Links the audio files to the corresponding form instance.
- Post Audio binary to signed S3 URL for the FileUpload object: Uploads the audio to a secure S3 bucket.
- File Upload: Completes the file upload process.
- Poll /AIFormFill: The system polls for the status of the AIFormFill object to be 'Completed' or 'Failed'.
- Get Form Data: Retrieves the latest form data.
- Update State with New Form Data: Updates the application state with the new data from the form.
- Get AIFormFill Object: Accesses the AIFormFill object for processing.
- Fetch Audio Files: Retrieves the audio files associated with the AIFormFill object.
- Get S3 Signed URLs: Obtains secure URLs for the audio files stored in S3.
- Fetch Audio Content: Downloads the audio content from S3.
- Transcribe with Whisper API: Uses the Whisper API to transcribe audio content to text.
- Transcript -> Form Data: Maps the transcribed text to the appropriate form fields.
- Store Form Data: Saves the mapped form data.
- Update Status to Completed: Sets the AIFormFill object's status to 'Completed' after a successful operation.
- Celery Worker: An asynchronous Celery worker performs tasks such as polling the status and updating the form data.
Each of these steps represents a critical point in the operational flow of the Care Scribe feature, ensuring a seamless and efficient form-filling experience for the user.
Scribe Integration
This section of the documentation details the integration of the Care Scribe feature into the Care application backend, describing the functionalities, database migrations, API endpoints, and background job scheduling.
Modules
The Care Scribe feature is composed of several key components that work together to enable voice-assisted form filling. Below we will detail each module's functionality and how they interact within the system.
Frontend Voice Recorder with Audio Size Splitting
The voice recorder is a critical component that manages the audio input from the user. It uses the useSegmentedRecorder custom hook to handle the recording process. This hook facilitates the splitting of audio data into manageable chunks to prevent file size from becoming too large, which is essential for efficient data transfer and processing.
// Example usage of useSegmentedRecorder hook
const { isRecording, startRecording, stopRecording, audioBlobs } =
  useSegmentedRecorder();
When the audio reaches a predefined size limit or time duration, the recorder stops the current recording session and starts a new one, ensuring seamless user experience and data integrity.
Uploading Files to S3
Once the audio is recorded, the files are prepared for upload. This process involves creating a signed URL for secure file transfer and then uploading the audio data to an Amazon S3 bucket. This is handled within the Scribe component, which interacts with backend API routes designed for file management.
// Example of the upload function within the Scribe component
const uploadAudio = async (audioBlob, associatingId) => {
  // ...code to handle file upload to S3...
};
Backend Transcription and Data Extraction Task
On the backend, a task is triggered to process the uploaded audio files. This involves several steps:
- Fetching Audio Files: Retrieving the audio files from S3.
- Transcription: Using OpenAI's Whisper to convert speech to text.
- Data Extraction: Applying GPT-4 Turbo to interpret the transcript and extract structured form data.
- Task Completion: Updating the
Scribeobject's status to 'Completed' and storing the extracted form data.
These steps are handled by a background worker task that ensures the process is asynchronous and does not block other operations.
Frontend Form Filling
After the backend processing is complete, the frontend Scribe component receives the structured form data. It then updates the relevant form fields accordingly, providing a smooth user experience. The component listens for changes in the Scribe object's status and reacts by filling in the form fields when the data becomes available.
// Example callback function to update form state
onFormUpdate={(fields) => {
  // Update form state with the new data
}};
Module Interaction
The frontend voice recorder module starts the process by capturing the user's voice and splitting the audio as needed. It then interacts with the S3 upload module to transfer the files securely. Once uploaded, the backend task takes over to transcribe and extract data from the audio files, utilizing powerful AI models. Finally, the structured form data is sent back to the frontend, where the form-filling module populates the form fields with the extracted data, completing the cycle.
By understanding the functionalities and interactions of these modules, developers can maintain, troubleshoot, and extend the Care Scribe feature as required.
Functionalities
The Care Scribe module adds voice recognition and form autofill capabilities to the Care application. The key functionalities include:
- Voice Recording Management: Handling the start and stop of voice recordings, managing file buffers, and pushing audio data to storage.
- Form Data Processing: Collecting and structuring form data, validating it against a JSON schema, and preparing it for AI processing.
- AI Interaction: Integrating with AI services for transcribing audio to text and generating AI responses to fill the form data.
Key components added with this feature include:
Scribe: A Django model that represents the form filling session and stores the transcription, AI response, and the status of the processing.ScribeFile: Extends theFileUploadmodel to handle specific file types associated with the Scribe feature.ScribeSerializer: Handles the serialization and deserialization of Scribe data for RESTful interaction.
Database Migrations
The integration includes migrations to create new models in the database:
0001_initial.py: This migration sets up the initial structure of theScribeandScribeFilemodels in the database.
API Endpoints
New endpoints are added to manage the Scribe feature:
/api/scribe/: Endpoints for creating, retrieving, and updatingScribeobjects./api/scribe_file/: Endpoints for managing the file uploads related to theScribeobjects.
These endpoints allow the frontend to start a form filling session, manage audio file uploads, and fetch the status and results of the AI processing.
Background Jobs and Scheduling
To process the audio recordings asynchronously and update the form data with AI-generated responses, Care Scribe leverages Celery, a distributed task queue:
tasks/scribe.py: Defines the Celery tasks for processing form fillings, such asprocess_ai_form_fill, which coordinates the AI transcription and response generation.
These tasks are queued up when a Scribe object's status is set to 'Ready' and are processed in the background without blocking the main application flow.
Pseudocode of Celery Task
Here's a simplified pseudocode representation of the Celery task for processing AI form fillings:
- Import necessary libraries and modules.
- Define global variable
OpenAIClient. - Define function
get_openai_clientto initializeOpenAIClientif it's not already initialized. - Define two prompts for the AI model.
- Define a shared task function
process_ai_form_fillthat takes anexternal_idas input.- Filter
Scribeobjects based onexternal_idand status. - Loop over each form in the filtered
Scribeobjects.- If the form doesn't have any audio files, log a warning and continue to the next form.
- Log the start of processing for the current form.
- Initialize an empty list for audio file URLs and an empty string for transcript.
- Loop over each audio file ID in the form's audio file IDs.
- Get the
ScribeFileobject for the current audio file ID. - Append the signed URL of the audio file to the list of audio file URLs.
- Log the audio file URL.
- Get the
- Try the following steps, and if any exception occurs, log the error and set the form status to 'FAILED'.
- Log the start of transcript generation for the current form and set the form status to 'GENERATING_TRANSCRIPT'.
- If the form doesn't have a transcript, generate a transcript using the OpenAI client and save it to the form.
- Log the start of AI response generation for the current form and set the form status to 'GENERATING_AI_RESPONSE'.
- Process the transcript with the OpenAI client to generate an AI response.
- Log the AI response.
- Save the AI response to the form and set the form status to 'COMPLETED'.
- Filter
The task is designed to handle various steps in the AI form filling process, including error handling to update the Scribe status to 'Failed' if any step encounters an issue.
Configuring Care Scribe with AI Services
Care Scribe supports integration with both OpenAI and Azure AI services. This section provides detailed instructions on configuring the service with these providers, the differences between the configurations, and the environment variables that need to be set.
Differences Between OpenAI and Azure AI Integration
- API Provider: The service can be configured to use either
OpenAIorAzureas the AI backend. - API Endpoint: Azure requires an additional endpoint setting (
AZURE_ENDPOINT), whereas OpenAI uses a default endpoint set within the library. - API Version: Azure integration allows specifying an API version (
AZURE_API_VERSION), which is not required for OpenAI. - Model Naming: For Azure, the model or custom deployment name is used, while OpenAI directly uses the model name provided by OpenAI.
Required Settings Variables
The following environment variables need to be configured depending on your choice of AI service provider:
API_PROVIDER: Set to either"openai"or"azure"to choose the AI service provider.TRANSCRIBE_SERVICE_PROVIDER_API_KEY: The API key for accessing transcription services from the chosen provider.AZURE_API_VERSION(only for Azure): Specifies the version of the Azure API to use.AZURE_ENDPOINT(only for Azure): Specifies the endpoint URL for Azure services.AUDIO_MODEL_NAME: The model name for audio transcription services (OpenAI) or the custom deployment name for Azure.CHAT_MODEL_NAME: The model name for chat services (OpenAI) or the custom deployment name for Azure.
Configuration Steps
-
Set Environment Variables: Based on the chosen provider, set the appropriate environment variables in
plugin_settings.For OpenAI:
plugin_settings.API_PROVIDER = 'openai'
plugin_settings.TRANSCRIBE_SERVICE_PROVIDER_API_KEY = '<your_openai_api_key>'
plugin_settings.AUDIO_MODEL_NAME = '<openai_audio_model_name>'
plugin_settings.CHAT_MODEL_NAME = '<openai_chat_model_name>'
For Azure:
plugin_settings.API_PROVIDER = 'azure'
plugin_settings.TRANSCRIBE_SERVICE_PROVIDER_API_KEY = '<your_azure_api_key>'
plugin_settings.AZURE_API_VERSION = '<api_version>'
plugin_settings.AZURE_ENDPOINT = '<azure_endpoint>'
plugin_settings.AUDIO_MODEL_NAME = '<azure_custom_deployment_name_for_audio>'
plugin_settings.CHAT_MODEL_NAME = '<azure_custom_deployment_name_for_chat>' -
Initialize AI Client: The AI client initialization is handled within the
get_openai_clientfunction, which now dynamically selects the AI service based on theAPI_PROVIDERsetting. -
Usage in Tasks: Use the configured AI client in your tasks to perform AI-related operations like audio transcription and chat completions, ensuring you set the model or deployment names correctly.
By following these configuration steps and setting the appropriate variables, Care Scribe will be able to interact with the chosen AI service provider efficiently and securely.
Frontend Integration

Integrating the Care Scribe feature into the frontend involves updating the React components, state management, event handling, and ensuring the UI/UX and accessibility features are considered.
Frontend Architecture Overview
The frontend architecture is built on React, utilizing functional components and hooks for state management. The integration of Care Scribe adds new components related to voice recording and form handling, which interact with the backend API.
Components and State Management
New components and hooks have been introduced to manage the state of voice recording and form data:
Scribe.tsx: The primary component that handles voice recording, audio data management, and interaction with the backend to post form data.formDetails.ts: Contains the metadata and schema of form fields that can be auto-filled using the Scribe feature, exported asSCRIBE_FORMSuseSegmentedRecorder.ts: A custom hook that manages voice recording, including starting, stopping, and segmenting the audio as it's recorded.
The state of the Scribe component is managed using local state hooks like useState and external state management with API interactions.
Event Handlers
Event handlers within the Scribe component control the flow of user interactions:
- Voice recording is initiated and controlled through button clicks, triggering corresponding methods in the
useSegmentedRecorderhook. - Form updates are handled via callbacks when the transcription process is completed and the data is ready to be filled in the form.
UI/UX Considerations
UI updates include:
- Adding a microphone icon to indicate voice recording capability.
- Visual feedback during recording, processing, and transcription phases.
- Modals and progress indicators to enhance user feedback during the operation of the Scribe feature.
Code Snippets
The following snippets from the patch files demonstrate key aspects of the Scribe feature integration:
// src/Components/Scribe/Scribe.tsx
// Example of the Scribe component initialization for the daily round form in CARE
<Scribe
  fields={DAILY_ROUND_FORM_SCRIBE_DATA} // Form field metadata
  onFormUpdate={(fields) => {
    // Update form state with new fields
  }}
/>;

// src/Components/Scribe/formDetails.ts
// Metadata for daily round form fields
const DAILY_ROUND_FORM_SCRIBE_DATA: Field[] = [
  {
    friendlyName: "Temperature", // Field name
    id: "temperature", // Field ID
    type: "number", // Field type
    default: null, // Default value for the field
    example: "98.6", // Example value for the field
    description:
      "A float to store the temperature of the patient. It can be null if the temperature is not taken", // Field description
    validator: (value) => typeof value === "number", // a validator function to verify the type integrity of the data being output from scribe
  },
  {
    friendlyName: "Investigations",
    id: "investigations",
    type: `{
      type: string[],
      repetitive: boolean,
      time?: string,
      frequency?: '15 min' | '30 min' | '1 hr' | '6 hrs' | '12 hrs' | '24 hrs' | '48 hrs',
      notes?: string
    }[]`,
    default: [],
    example: `[
      {
        type: ["Haemotology (GROUP)"],
        repetitive: false,
        time: "2024-07-31T18:10",
        notes: "Patient is allergic to penicillin."
      },
      {
        type: ["ECG", "X-Ray"],
        repetitive: true,
        frequency: "24 hrs",
        notes: "Patient is going nuts"
      }
    ]`,
    description:
      "A list of objects to store the patient's investigations. The type field should be an array of strings corresponding to the names of the investigations provided in the options. The repetitive field should be a boolean value. The time field should be a string and only be filled if repetitive field is false. The frequency field should be a string with one of the following values: '15 min', '30 min', '1 hr', '6 hrs', '12 hrs', '24 hrs', or '48 hrs' and should be only filled if this is a repititive investigation. The time field should be of the example format if present - (2024-07-31T18:10). The notes field should be a string. If the type is not available in options, DO NOT MAKE IT.",
    validator: (value) => {
      if (!Array.isArray(value)) return false;
      value.forEach((i) => {
        if (!i.type || !i.repetitive) return false;
        if (i.repetitive && !i.frequency) return false;
      });
      return true;
    },
  },
  // Additional fields...
];

// All metadata for all forms, combined with dynamic options if any
export const SCRIBE_FORMS: { [key: string]: ScribeForm } = {
  daily_round: {
    // key name can be anything, but we prefer to keep it as the name of the form
    id: "daily_round", // id of the form
    name: "Daily Round", // name of the form
    fields: async () => {
      // fields of the form

      // if the form needs dynamic options from the server, we fetch them here.
      const investigations = await loadInvestigations();

      return DAILY_ROUND_FORM_SCRIBE_DATA.map((field) => {
        if (field.id === "investigations") {
          return {
            ...field,
            options: investigations.map((investigation, i) => ({
              id: i,
              text: investigation,
            })),
          };
        }
        return field;
      });
    },
  },
};
Handling Dynamic and Exhaustive Options
In typical scenarios, a dropdown menu contains predefined options embedded directly into the frontend code, making it straightforward to pass these options to Scribe. This is achieved by simply assigning a variable to the form's metadata. However, certain cases require fetching options from the server that are extensive in nature. For instance, consider the investigations we recently fetched and integrated into our request to Scribe.
In some situations, dropdown options are too exhaustive (e.g., thousands of ICD-11 diagnoses). In such cases, it is neither practical nor efficient to pass all options to Scribe. Instead, we take a different approach: we do not send any options to Scribe, allowing it to return exactly what the user inputs as text. This text is then sent to the frontend, which queries the necessary endpoints using the input value as a search term and presents the relevant options to the user.
Example Configuration
{
  friendlyName: "Diagnosis",
  id: "icd11_diagnosis",
  type: '{diagnosis: string, verification_status: "unconfirmed" | "provisional" | "differential" |"confirmed", is_principal: boolean}[]',
  default: [],
  example:
    "[{diagnosis: '4A42.0 Paediatric onset systemic sclerosis', verification_status: 'confirmed', is_principal: true}, {diagnosis: '2', verification_status: 'provisional', is_principal: false}]",
  description:
    "A list of objects to store the patient's diagnosis along with their verification status and whether it is the principal diagnosis. If not specifically stated, set is_principal to false. NOTE: only one principal diagnosis can exist. The diagnosis field should be a string that may contain a corresponding diagnosis ID. The verification_status field should be a string with one of the following values: 'unconfirmed', 'provisional', 'differential', or 'confirmed'.",
  validator: (value) => {
    if (!Array.isArray(value)) return false;
    for (const d of value) {
      if (!d.diagnosis || !d.verification_status) return false;
    }
    return true;
  },
}
Future Considerations
While this method effectively manages large datasets, future improvements could involve implementing a vector database that directly interfaces with Scribe. This enhancement would streamline the process by efficiently handling and querying large sets of data, thereby improving both performance and user experience.
Troubleshooting Guide
Common Issues and Solutions
Here's a list of potential problems users might encounter while using the Care Scribe feature, along with solutions to address them:
Issue: Voice recording fails to start. Solution:
- Ensure that the user has granted microphone access to the browser.
- Verify that the microphone is functioning correctly and is not being used by another application.
- Check the browser console for any error messages related to audio capture.
Issue: Transcription accuracy is low. Solution:
- Speak clearly and at a moderate pace during the recording.
- Avoid background noise that might interfere with the audio capture.
- Consider using a higher-quality microphone for better audio input.
Issue: Form data is not mapped correctly to the fields. Solution:
- Review the form field metadata in formDetails.ts to ensure the friendlyName and id attributes are accurate and match the form structure.
- Check the transcript for any errors or inconsistencies that might cause misinterpretation during the data extraction process.
Issue: AI response generation is taking too long. Solution:
- Verify that the backend task queue is running and processing tasks efficiently.
- Check the performance of the AI service and ensure it is responding within acceptable timeframes.
- Consider optimizing the AI prompts and data structures to improve the response time.
Logging and Error Tracking
Care Scribe utilizes logging mechanisms to record events and errors during the operation of the feature:
- Frontend Logging: The Scribe component logs events and errors to the browser console using the console.log and console.error methods.
- Backend Logging: The Django application logs events and errors to the server logs using the Python logging module.
Sentry.io is utilized for error tracking and capturing errors from both the frontend and the backend loggers, offering real-time monitoring and reporting of errors. This provides valuable insights into potential issues and areas that require improvement.
Appendix
Code Snippets
Here are some code snippets demonstrating key aspects of the Care Scribe implementation:
Frontend Voice Recorder Initialization:
// Example of initializing the voice recorder with the useSegmentedRecorder hook
const {
  isRecording,
  startRecording,
  stopRecording,
  audioBlobs,
} = useSegmentedRecorder({
  onNewBlob: handleNewAudioBlob,
  maxBlobDuration: 23 * 60 * 1000, // 23 minutes in milliseconds
  maxBlobSize: 20 * 1024 * 1024, // 20 MB in bytes
});
Backend Celery Task for AI Form Fill:
@shared_task
def process_ai_form_fill(external_id):
    scribe_obj = Scribe.objects.get(external_id=external_id)
    # ...code to process the audio files and generate the AI response...
    scribe_obj.status = 'Completed'
    scribe_obj.ai_response = ai_response
    scribe_obj.save()
Form Field Metadata Example:
// Example of form field metadata for the Scribe feature
export const DAILY_ROUND_FORM_SCRIBE_DATA: Field[] = [
  {
    friendlyName: "Temperature",
    id: "temperature",
    type: "number",
    example: "98.6",
    // Other field attributes...
  },
  // Additional fields...
];
These snippets provide a glimpse into the inner workings of the Care Scribe feature and can be helpful for understanding its implementation details.
References
- OpenAI Whisper: https://openai.com/blog/whisper/
- GPT-4: https://openai.com/research/gpt-4
- GPT-4 Turbo: https://platform.openai.com/docs/models/gpt-4-turbo-and-gpt-4
- Django: https://www.djangoproject.com/
- React: https://reactjs.org/
- Celery: https://docs.celeryproject.org/en/stable/
Acknowledgements
- OpenAI for providing the Whisper and GPT-4 AI models that power the Care Scribe feature.
- The Django and React communities for developing and maintaining the frameworks used in the Care application.
- The Celery project for providing the distributed task queue system used for asynchronous processing.
Changelog
- 2024-04-15: Initial draft of the Care Scribe Technical Documentation. ~ Ashesh
- 2024-05-07: Fixes to the flowchart, Add details on Celery task, and revise Accessibility and Dependencies. ~ Ashesh
- 2024-08-19: Updates to Scribe regarding handling dynamic data, and shift to
SCRIBE_FORMSas scribe schema definition. ~ Shivank